I love hoverboards. I wasn’t sure if I wanted to buy one when they first came out but once they started to flood the neighborhoods when everyone got one for Christmas I decided to give them a shot.
It does take some getting use to but if you know how to balance and get comfortable with shifting your weight its possible to learn in a week or two of practice.
But let’s get started with the basics:
What’s a Hoverboard anyway?
Technically, they’re self-balancing scooters – Wikipedia and OED refuse to recognise anything but the boards in Back to the Future as “hoverboards”. But the smooth, effortless ride is a surprisingly close approximation to gliding above the ground.
These little boards have a lot going on under their plastic hoods, and vary in size, shape, and price wildy. Finding the right hoverboard and learning how to safely ride a self-balancing scooter can take some doing. This beginner’s guide to hoverboards takes the guesswork out of buying and operating the latest craze in personal transportation.
A Hoverboard’s Nuts and Bolts

How a Hoverboard “Hovers”
So, they don’t actually hover – which seems pretty impractical right now. The technology behind self-balancing boards still manages to suspend the rider over two laterally mounted wheels with next-to-no effort. As the rider leans forward – even in the slightest – the board responds by rolling the wheel or wheels forward, thus catching and balancing the rider’s weight and preventing them from falling forward.
If either or both sides of the board sense the rider applying pressure backward, it will respond by rolling the wheel/s backward thus catching and helping to balance the rider. So, yeah, you’re kind of hovering.
The Hover-motor Motor
Each wheel contains an electric motor in its hub. The Jetson V8 comes with dual 400-watt motors – fairly standard for higher-end boards. That’s enough power to haul up to 300lbs at around 10 mph – 10 mph is just under a sprint for most people. The Swagtron T6 boasts a top speed of 12 mph and a carrying capacity of 400 lbs. However, retail models come with a speed governor – a small device that monitors and regulates speed – that keep the boards down to around 7.5 mph for safety.
Speaking of safety, hoverboards are not safe for small children to use. Some smaller boards – like the SAVA Smart-K2 Mini Board for Kids – have a minimum recommended weight of 45-50 lbs, and minimum age around 5-7 years old. Segway recommends riders age 16-60 use the miniPRO. While there are countless clips of toddlers scooting around on self-balancing boards, a fall at 10 mph from a device several inches off of the ground could injury an adult. Be careful out there and always provide adequate supervision.
How does a Hoverboard Work? Balancing Technology
The motors link up to an impressive array of hardware and software under the cover. A couple of gyroscopes, infrared sensors, and tilt/speed sensors connect to the logic board – similar to a motherboard in a computer – to keep the board balanced. Pressure pads – located directly under the rubber footpads on the deck of the board – relay information about how much pressure the rider is applying either forward or backward to the logic board.
While this process may seem convoluted, it actually mimics how humans achieve bipedal locomotion. Our inner ears, eyes, and proprioception act like a hoverboard’s gyroscope and sensors picking up vital data from the external world. The soles of the feet act as the pressure pads, and our own logic board – the brain – processes the information. The result is an almost spooky intuitiveness – like the board can read your mind.
Even though some models come with LED lights, bluetooth capability, and built-in speakers – the Gt Hover GTS comes with all of these and turn signals – it’s the lithium ion battery that takes up most of the room under the hood. Cheap, uncertified batteries also took up most of the headline space concerning hoverboards.
Since February of 2016 hoverboard batteries come with a safety certificate from the UL – an international safety consulting and certification company. Only buy a board that has a genuine UL certification, or it might catch on fire.
The Exterior

Every company has its own take on colors, shape, and design. But nearly all hoverboard exteriors are comprised of the same features: two rubber footpads, two wheels, and a plastic cover. Sometimes the only difference between a $1000 board and a $200 board is the color of the plastic. If you can’t find a board that catches your eye, companies like Hover Cover make easy to install vinyl covers in a plethora of colors and patterns.
Buying Guide

Online Only (Mostly)
Knowing how a hoverboard works, and knowing how to score the best deal on one are two different things. Amazon.com is a great place to start. The online juggernaut carries nearly every legitimate brand, they offer boards for nearly any budget (plan on at least $200), and free shipping with Prime. Plus, Amazon offers 2 and 3-year protection plan that extend well beyond the manufacturer’s warranty. A protection plan for an $800 board costs $60-$80, and can save you time, stress, and money down the road.
Direct From the Source
Another great option to help move-along the buying process is to shop the manufacturer’s website. The search for the best ride will probably lead, eventually, to a few hoverboard company’s websites. The latest info on products, customer support, and exclusive sales are pretty much standard at sites like these. Taking the time to research and compare different boards will provide a peace-of-mind that can only come from knowing you got the right ride at the best possible price.
Epikgo and Halo Board sell some of the best boards available, and a quick visit to their sites can help customers looking for a high-end board understand the technology, options, and features that each model offers. With newer, better components and boards being released at a breakneck pace, staying up-to-date is paramount.
Worth noting, Halo Boards has teamed up with UPS to offer free shipping on all boards. Swagtron.com operates a lot like the aforementioned manufacturer’s sites with one significant difference: Swagtron offers certified refurbished self-balancing scooters at ridiculously low prices. Just click the Clearance link in the site’s menu bar to see their current selection of refurbished products.
Call Ahead

Finding hoverboards in actual brick-and-mortar stores is difficult – don’t plan on test driving a specific model at your local electronics shop. Retailers like Target, Walmart, BestBuy, and Toys R Us carry a limited selection, but most only offer hoverboards through their websites. Double check that the board is actually in-stock before heading to the store.
Shop Smart
Here are some additional suggestions to help ensure you don’t waste a few hundred bucks on a rubbish board:
- A UL 2272 certified battery is a must – not really a suggestion.
- In some counties and cities it’s illegal to operate a self-balancing scooter on pedestrian and motor ways. Check local laws to make sure it’s legal to take your board around the block before your buy it.
- Battery range varies based on the size of the battery, the peripherals – speakers, lights, etc. -, rider size, and motor size. Most get between 10-12 miles per charge.
- Metal-framed boards tend to last longer and offer a better build quality.
- In general, larger riders will want scooters with larger motors, platforms, and wheels – the Swagtron T6 Off-Road currently has the highest weight capacity – to be able to get the most out of their equipment, while smaller riders will get a more intuitive and safe riding experience from less hefty hardware.
- Consider the primary use. Is it a toy that rarely leaves the confines of the driveway like the Razor Hovertrax 2.0, or is it how you’ll make your daily commute to-and-from work or school? If it’s the latter, the Segway miniPro is the best option. Even though the miniPRO has a different steering mechanism than the rest of the hoverboards mentioned, it really is one of the few boards available that can hold up to being a daily commuter.
- Take into account the terrain you’ll be riding over. Some boards are designed to zip across concrete and others have the clearance and tire tread to go off-road.
- Sometimes all the bells and whistles are worth it, other times they are not. Street Saw makes the StabilitySaw App Controlled 10 Inch Hoverboard. Not only is it one of the fastest boards on the market capable of rolling over gravel, grass, and cracked sidewalks and roads, the mobile app also allows you the ability to control top speed, motor resistance, and turning speed, watch the current speed, see the board’s current position and location, and detect and analyze faults. Street Saw makes the exact same board minus the mobile app – the StabilitySaw 10 Inch Hoverboard – for $200 less. Is watching your current speed on your mobile device worth the $200?
- Save room in your budget for additional gear.
- A charger. Most come with one, but you won’t get far if it doesn’t. Aftermarket chargers are available all over the internet. Just make sure it’s compatible with your specific board.
- A helmet, elbow pads, and knee pads. Protective gear may look nerdy, but it’s way cheaper than a cast. Evo.com carries top-tier helmets and pads like the Triple 8 Brainsaver and the Pro-Tech Street Gear Pad Set for kids.
- A carrying case. Hoverboards weigh between 15lbs and 40lbs and can become burdensome quick. Swagtron makes a rolling carry case with telescoping handle, but other cases are available at less than half the price. Make sure the carrying case you choose is the right size your board.
- Vinyl, silicone, or rubber cover/bumpers. One of the top complaints about hoverboards is that they get scuffed and scratched easily. For as little as $10 you can snazz up your board while keeping it protected.
How to Ride a Hoverboard

First Thing First
Reading the user manual is the first step to learning how to safely operate a hoverboard. Not the most exciting part of the learning process, but taking 15 minutes to read over the manual can expedite the overall process. Another option is to visit the manufacturer’s website and search for instructional videos specific to your board. Some boards come programmed with a beginner’s mode – the board’s speed and power is limited to help avoid accidents while first learning to ride.
Others will have specific instructions for calibrating the board – most will require an initial calibration that takes about a minute. Skipping this step could prevent you from using your gadget to its full potential.
Charge the Battery
Make sure the board is fully charged. It would be more than a little disappointing to gear up for your first cruise only to have forgotten to charge the battery. Most lithium ion batteries come charged – at least partially – and don’t require charging or conditioning before use. Check the owner’s manual for specific charging instructions before hopping on the board.
Gear Up
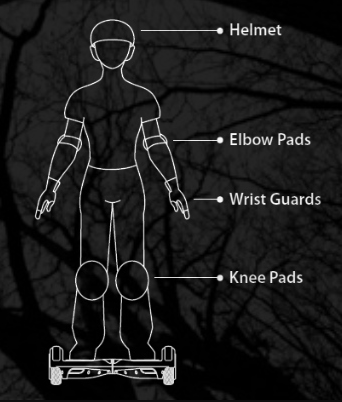
If you have protective gear, your first time trying a hoverboard is a great occasion to wear it. A helmet, elbow pads, and knee pads can prevent serious injuries, and keep you safely progressing toward learning how to ride a hoverboard.
Where to Take Your Maiden Voyage
Find a flat, hard surface with plenty of room – a space big enough to park a car will do. Using a wall or hand railing can help maintain balance, but isn’t necessary. Avoid uneven or rough terrain, hills, or areas cluttered with objects. A driveway, garage, patio, empty parking lot, or a large, uncarpeted room are ideal.
Determining Dominant Foot
Take a moment to determine your dominant foot. Usually, if you are right handed your right foot will be dominant and vice-versa on the left. If you’re not sure which foot is dominant, try throwing or kicking a ball. Whichever side you’re most comfortable throwing/kicking with will usually be your dominant foot side.
Stepping Onto the Board

Turn the board on, and place your dominant foot on the footpad. Most hoverboards don’t have a designated front and back, so you don’t need to worry which direction the board is facing when stepping on. However, it’s best to step on the board forward, and off backward. Level the top of the board using your foot. If the board is already calibrated it may level itself out when powered on. Once the board is level, carefully step the other foot on. Placing a hand on a wall, railing, or support will make this easier.
Hoverboards are designed to be intuitive, so they recognize minute movement and pressure and adjust accordingly. The board may roll forward and backward while you gain your balance. With both feet on, evenly distribute your weight – forward, backward, and side-to-side – and stand up tall with a slight bend in the knees.
Going Forward

After finding your balance standing, apply a light forward pressure by slightly leaning forward while pressing gently through your toes. Maintain even, steady pressure until you’re ready to slow down and stop. Center your weight and press through your heels to come to a stop. Try setting or marking a stopping point and trying to stop on or close-to the point.
Backing Things Up
Keep repeating the above process until you’re comfortable moving forward and stopping.Traveling in reverse is similar to going forward. Lean back slightly, press lightly through the heels, and look over either shoulder. To stop, gently apply pressure to the toes, and center your weight. Learning to go backward might take longer than learning to ride forward. Be patient and diligent.
Trying Turns
To practice turning, start from a centered, standing position. Begin traveling forward at a comfortable speed. Put more pressure in the right toes to veer left, and more pressure in the left toes to veer right. As more pressure is applied, the wheel/s speed up to prevent the rider from falling toward the direction of the pressure.
So, when one footpad receives more forward or backward pressure than the other, the board responds by speeding up the rotation of that wheel causing the board to turn in the opposite direction. After a few turns, return to a centered position.
Tighten Up Your Turns

Next, try applying equal pressure through the right heel and the left toes to turn in a circle to the right. Press through the left heel and right toes to turn to the left. Adjusting the amount of pressure in either foot will change the diameter and shape of the turn. Try turning 180 degrees and 360 degrees to both sides. Using this technique you can ride your board through places that seem unnavigable – even doorways that are narrower that the board!
Keep Progressing
From here, you’re free to challenge yourself with more advanced techniques. Navigating sidewalks and trails, shove-its, there are even clips of people riding hoverboards down stairs – not recommended. If you need inspiration, here’s a video of a 7-year-old pushing a hoverboard to its absolute limits in a skatepark.
Get Out And Start Hoverboarding
Just because these personal transportation vehicles don’t actually hover doesn’t mean they aren’t impressive feats of technology and innovation. Gyroscopes, sensors, and other electronics do more than balance the board and rider, they provide an intuitive, effortless ride that is easy to get the hang of.
Use this guide to help find and make sense of the numerous hoverboard options. Once you’re chosen a board that’s perfect for you, return to the Ride On section to start mastering the hover.
It took me a long time to get use to hoverboarding. I still can’t go super fast but I can tell you it is super addicting. My nephew and I started out together and practiced everyday for about 2 weeks. I was able to lean almost all the way forward and go pretty fast and do a switch turn. My nephew on the other hand really got it and was able to pretty much do all the basic tricks. So its possible to pick it up fast.
Happy Hovering.